Wie erstelle ich einen Feed mit WooCommerce(WordPress)?
Schritt 1: Plugin installieren https://wordpress.org/plugins/best-woocommerce-feed/
Schritt 2: Plugin einrichten und Produkt-Feed erstellen.
- Schritt 2.1: Erstelle einen neuen Feed in dem du auf "Add new" klickst.
- Schritt 2.2: Wähle den Feed Merchant "Custom" aus.
- Schritt 2.3: Wähle den Feed Type "XML" aus.
- Schritt 2.4: Wähle bei XML Header "include" aus.

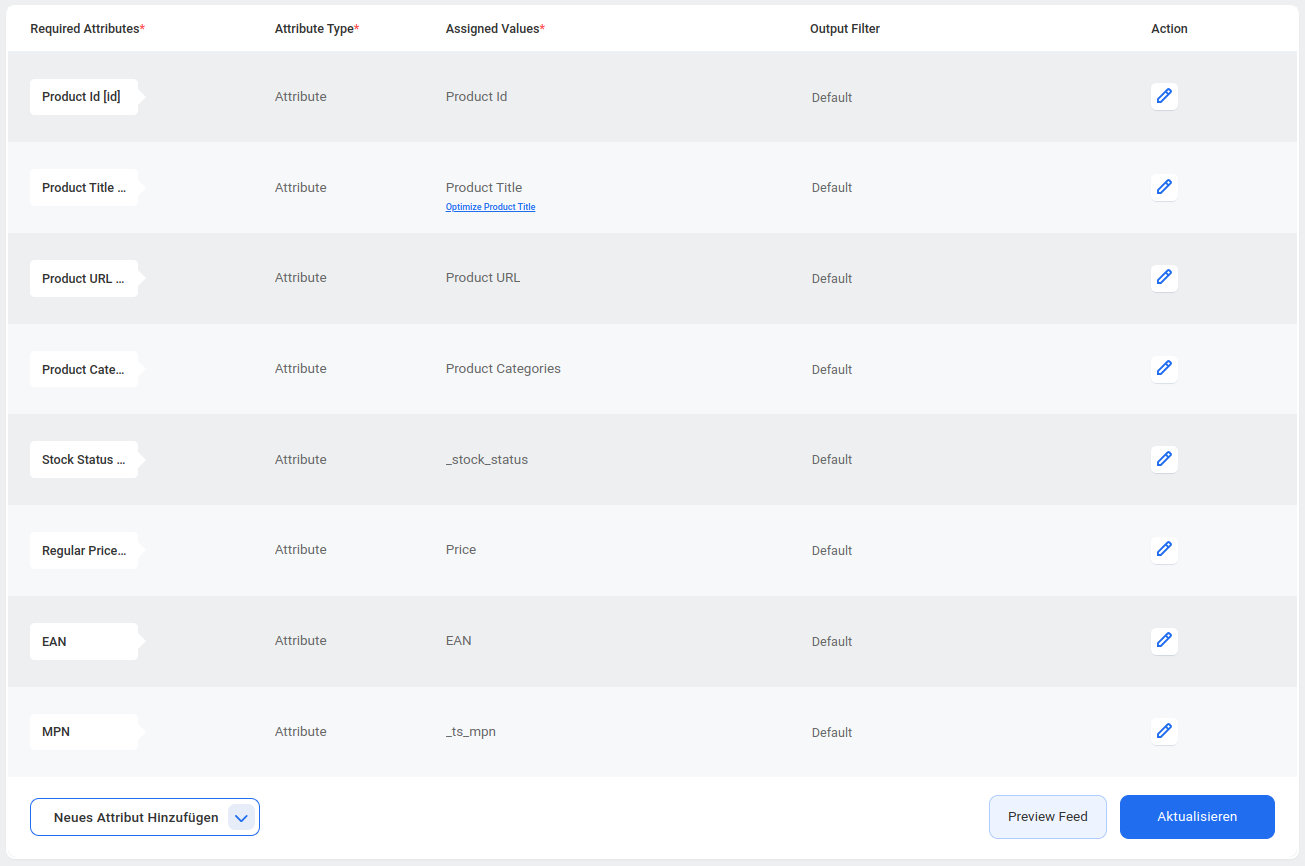
Schritt 3: Attribute richtig einstellen
Bei einem Custom Feed müssen die Attribute selbst erstellt werden. Um ein neues Attribut hinzuzufügen klicke dafür auf "Neues Attribut hinzufügen". Baue bitte deinen Feed genauso wie unten im Screenshot auf. Alle Attribute bis auf EAN und MPN bitte als "New Attribute" anlegen. EAN und MPN als "New Custom Attribut".
- Product Id(Basic Information) – Attribute – Product Id(Primary Attributes) – Default
- Product Title(Basic Information) – Attribute – Product Title(Primary Attributes) – Default
- Prouct URL(Basic Information) – Attribute – Product URL(Primay Attributes) – Default
- Product Categories(Basic Information) – Attribute – Product Categories(Primary Attributes) – Default
- Stock Status(Availability & Price) – Attribute – _stock_status(Product Custom Attributes) – Default
- Regular Price(Availability & Price) – Attribute – Price(Price Attributes) – Default
- EAN – Attribute – EAN(EAN by WooCommerce) – Default
- MPN – Attribute – _ts_mpn(Product Custom Attributes) – Default

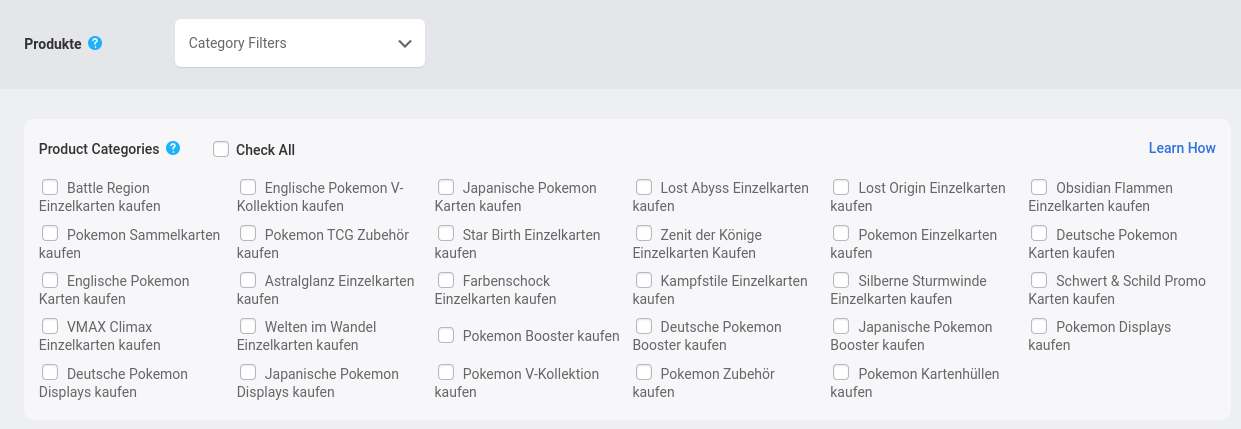
Schritt 4: die richtigen Produkte zum Feed hinzufügen
Schritt 4.1: Klicke auf den Button "Product filter".

Schritt 4.2: In dem Reiter "Produkte" wählst du "Category Filters" aus. Nun siehst du alle deine Kategorien. Du kannste alle Produkte(Kategorien) hinzufügen bis auf Einzelkarten!

Schritt 5: Intervall für die automatische Aktualisierung setzen
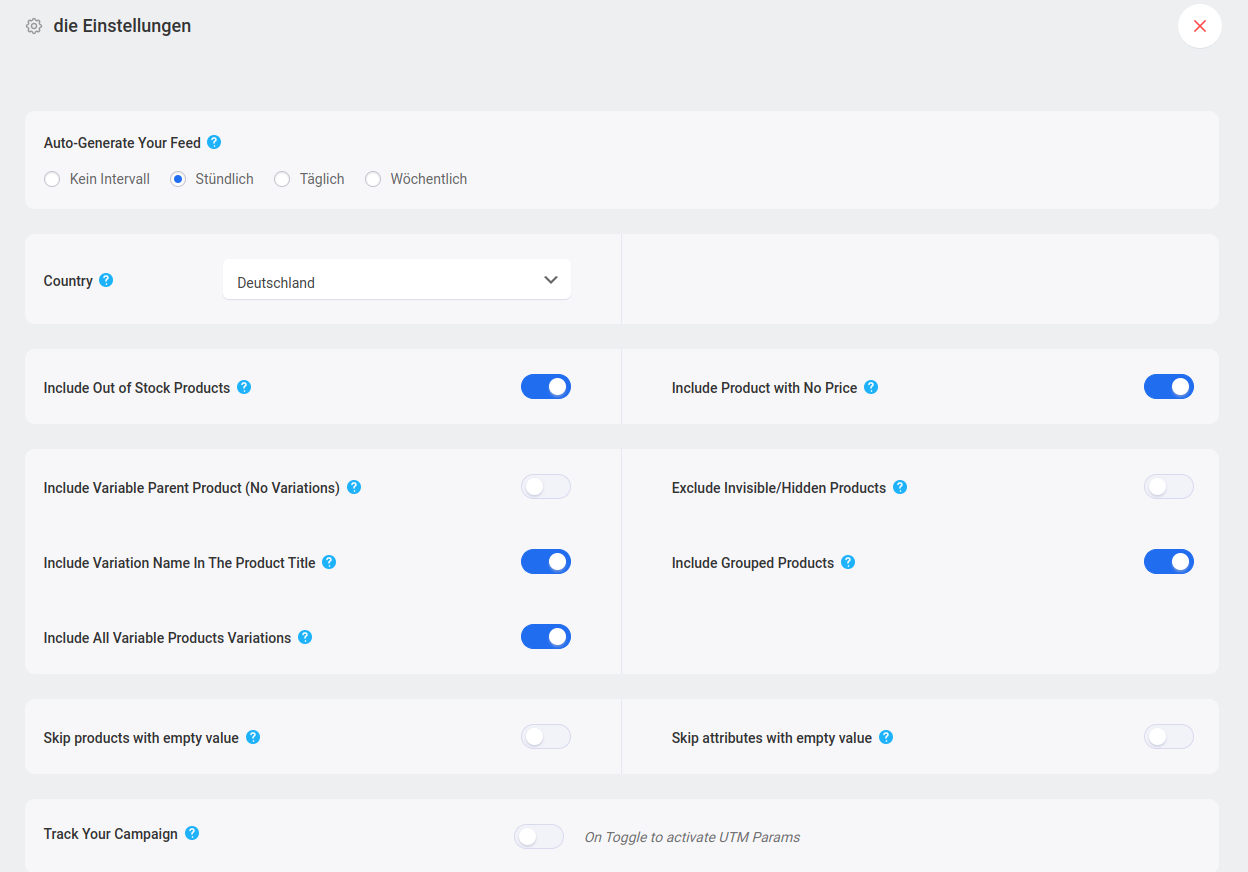
Schritt 5.1: Klicke auf den Button "die Einstellung".
Schritt 5.2: Setze unter Auto-Generate Your Feed: auf Stündlich oder Täglich.
Schritt 5.3: Setze die weiteren Einstellung genauso wie auf dem Screenshot.

Schritt 6: Produkt-Feed veröffentlichen
Klicke auf den Button "Veröffentlichen" und kopiere im Anschluss rechts aus der Sidebar "Ihre Feed-URL". Hinterlege deinen Feed wie hier erklärt in deinem Konto.
Bei Fragen oder Hilfebedarf stehen wir euch per E-Mail, im Discord https://discord.gg/KYWMakKDez oder auf Instagram https://www.instagram.com/pokecheck.de/ zur Verfügung.
Liebe Grüße, dein PokeCheck-Team.
Dokumentation
Weitere Dokumentationen
Alle Dokumentationen- Produkt Feed für PokeCheck v2
- Shopify: Wie erstelle ich mit einem Plugin ein Feed?
- Pokecheck v2: Vorteile & Infos für Shops
- Shopify App: PokeCheck XML Feed installieren & einrichten
- CSV Liste als Feed für PokeCheck: Schritt-für-Schritt-Anleitung
- Produkte über eine TXT-Liste auf PokeCheck importieren
- Schritt-für-Schritt-Anleitung: Einrichtung eines PokeCheck Profils als Shop
- Dokumentation für Feeds, Produktzuordnung etc.
- PokéCheck Badges auf der Website einrichten
- Wieso sind meine Produkte nicht korrekt zugeordnet?